


Welcome to the ultimate beginners guide to making perfect Kombucha at home, every time! This guide contains all the handy tips and tricks you need to ensure you master the art of kombucha brewing first time, even if you're new to the world of fermenting!
We ALWAYS use, & teach a method which uses the batch brewing method, in a continuous brewing vessel. This makes kombucha easy, and means you don't need any fancy equipment.

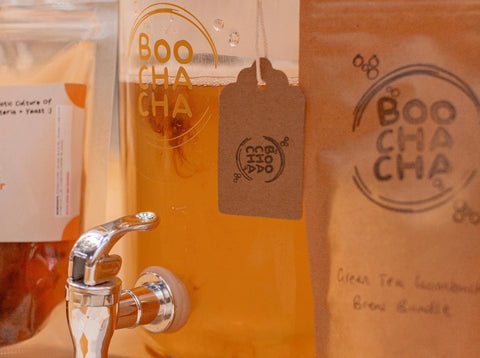
What You'll Need to Get Started
Our Complete Kombucha Starter Kit has become famous for its 5 star ratings on ease of set-up (particularly for beginners), clear instructions and great tasting kombucha, right from the start!
If you're getting started without a kit, here is a list of what you need to make your own kombucha by following our 5 step kombucha brewing method:
- 3 Litre glass fermentation jar with a tap. This is where the fermenting magic will take place. Make sure you clean thoroughly with warm soapy water, or use a sterilising method before setting up
- Glass bottle to store your Kombucha once it's ready! Reuse clean wine bottles / juice bottles, that fit nicely in your fridge
- A kombucha SCOBY with starter liquid (300-400ml is ideal)! This is your starter culture, and we have a guide here on how you can actually grow your own, or if you have a friend who already makes Kombucha, here is how they should split a bit off for you to get started
- Green or Black Tea (8-10 high quality tea bags or 12 grams large leaf loose tea) and white cane sugar (120 grams). These provide fuel and nutrients for the SCOBY to grow and are vital to kickstart the fermentation process
- Water! You'll brew your tea and sugar in 1 litre of boiling water (everyone has a 1 litre plastic jug somewhere haha), and add another litre of cold water to your jar, so 2 litres of water in total
- Clean Cotton / Muslin / Cloth Cover & Rubber Band, aka, a breathable lid to protect your Kombucha from flies and dust during fermentation
- We'll also use a clean one litre measuring jug and a clean spoon to brew, and cool the tea before you add to the SCOBY

This set-up is the perfect size to fuel 1 - 2 people with a daily serving of fresh Kombucha, but you can easily expand production with a larger jar should you need to!
Here's the steps to your beginners Kombucha brewing guide
We specialise in providing Complete Kombucha Starter Kits which have specifically been designed with beginners in mind.
These starter kits contain everything you need for the first two batches of Kombucha, as well as a life time of Kombucha brewing support from us, and a few fun extras too.
Step 1: Get your tea brewing
Begin by brewing your litre of sweet tea in the amounts detailed above, in your 1 litre measuring jug.
Make sure to stir your tea until the sugar has fully dissolved, and then set somewhere to cool to room temperature.
We always use green tea, because the colour is pretty, its light and citrussy, and it is packed with polyphenols and antioxidants.
Important note: the quality of the tea you use has a HUGE impact on the final flavour of your Kombucha, so try to avoid dusty cheap tea bags.
Step 2: Meeting your SCOBY
.... And then giving it a name!
Add your SCOBY and all the starter liquid it is stored in (well fermented Kombucha) to your clean 3 Litre fermentation vessel with tap. The more starter liquid, or the more powerful, the better. Aim for 300-400ml, and make sure it has a vinegary / acidic smell to it.
Your wonderful SCOBY is the beast that kickstarts the fermentation process, it introduces the live bacteria to your brew, and transforms your sweet tea into a probiotic-rich Kombucha.
If you look after your little Stevie, he will brew delicious Kombucha for a lifetime (and it isn't very hard to keep him happy, I promise).

Step 3: Being patient / fermentation process
Once your sweet tea has cooled to room temperature, you need to remove the tea-bags / loose tea (super important to get all of this out), and then add that first litre of cool tea / liquid into the jar with your SCOBY.
Then add in the second litre of cool water to the jar, so the total liquid is now up to 2 litres.
Cover the jar with the cloth cover / breathable lid, securing it with the rubber band.
This allows your Kombucha to breathe while keeping contaminants out.
Now is where your patience comes in, although there are a few things you can do to speed this part up.
1. Make sure you use a good amount of starter liquid (400ml is best to get 2 litres of Kombucha going fast). Fun fact: the starter liquid is actually more important than your cellulose SCOBY matter.
2. Make sure this starter liquid is powerful. The more acidic (lower pH) / vinegary / longer its been fermented, the better.
3. Keep your brewing vessel somewhere at the warm end of room temperature. Airing cupboards, on top of fridges / freezers, near radiators, all perfect. It needs to be above 16°C to get going (below this you will probably get mould), but it will take much longer at this this temperature. Ai for 22-26°C and it will get brewing much faster. Top tip, use an adhesive thermometer to keep an eye on the temperature, as the brew generates a small amount of its own heat.
Step 4: Monitoring Fermentation
Depending on the speeding up factors you've used or not used, the fermentation period for your first batch will typically range from 10 to 28 days.
The first brew normally takes a little longer than subsequent brews, and the best way to see how its getting on, is to simply taste your Kombucha.
Before tasting, always check the surface of your brew for new SCOBY growth as a thin, slimy looking layer on the surface of the liquid in the jar. This is a really good sign of a strong fermentation, but should never look dry and fluffy.
Check against our SCOBY gallery here.
We recommend starting to taste your first brew after around 10 days (see where that tap comes in VERY useful), and then subsequent days until it reaches a balance of sweetness and tartness that suits your palate.
This is where a little patience pays off, but if you get this first brew right, your future Kombucha will thank you for.

Step 5: Bottling Your Brew
Drain your Kombucha into a clean glass bottle that fits nicely in your fridge (another moment where your tap comes in useful).
Super important point: leave your SCOBY and 3-4 inches of Kombucha in your jar, to act as the starter for your next refill of sweet tea. It is a great idea to then leave this Kombucha to sit for 10 days, before doing your next refill of sweet tea. You only need to do this in between the first and second brew, but it will give your growing SCOBY layer a bit more time to thicken up.
After that, you're ready to refill with another 2 litres of sweet tea, and we have a whole range of Kombucha Brew Bags for that!
Check out our Kombucha Recipe Club for some easy, natural Kombucha flavouring options, and let us know if you create something delicious you think we should know about!
By brewing Kombucha at home, you are creating a habit that is both the maximum environmentally sustainable option, as well as extremely beneficial to your well-being, as with anything that you can create for yourself at home.
Each batch of Kombucha you create will be slightly different.
You'll learn that it isn't an exact science, but by setting out with an intent to provide your body with quality, fresh, authentic Kombucha, that offers probiotics, digestive enzymes, and detoxifying acids with every glass.
Take a look at all the free Kombucha brewing guides and recipes we share over on our Instagram page, and follow us to keep up with our new products and special discounts.